深入浅出 Cocoa 之 Core Data(4)- 使用绑定
罗朝辉(http://blog.csdn.net/kesalin)
CC 许可,转载请注明出处
前面讲解了 Core Data 的框架,并完全手动编写代码演示了 Core Data 的运作过程。下面我们来演示如何结合 XCode 强大的可视化编辑以及 Cocoa 键值编码,绑定机制来使用 Core Data。有了上面提到的哪些利器,在这个示例中,我们无需编写 NSManagedObjectModel 代码,也无需编写 NSManagedObjectContext,工程模版在背后为我们做了这些事情。
今天要完成的这个示例,有两个 Entity:StudentEntity 与 ClassEntity,各自有一个名为 name 的 Attribute。其中 StudentEntity 通过一个名为 inClass 的 relationship 与 ClassEntity关联,而 ClassEntity 也有一个名为 students 的 relationship 与 StudentEntity 关联,这是一个一对多的关系。此外 ClassEntity 还有一个名为 monitor 的 relationship
关联到 StudentEntity,表示该班的班长。
代码下载:点此下载
=========================================================================
接前半部分
7,创建 NSArrayController,关联对象
现在回到 xib 中来,选中 StudentView.xib,设置StudentView 的 File's Owner 的类为 StudentViewController;使用 Control-Drag 将 File's Owner 的 view 指向 custom view。
向其中拖入两个 NSArrayController:ClassPopup 和 Students。
设置 ClassPopup 的 Object Controller Mode 为 Entity Name,实体名为:ClassEntity,并勾选 Prepare Content。
设置 Students 的 Object Controller Mode 为 Entity Name,实体名为:StudentEntity,并勾选 Prepare Content。
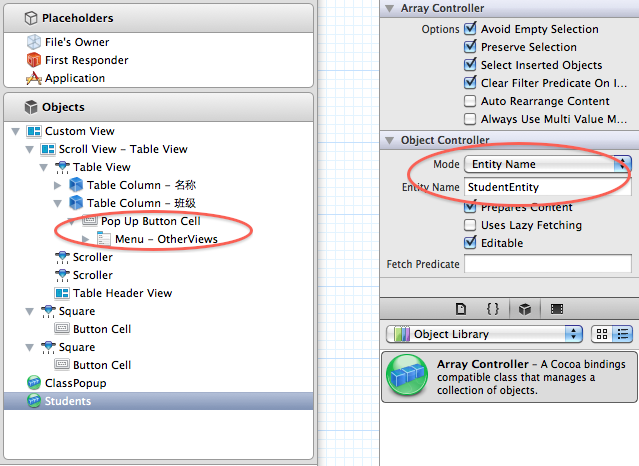
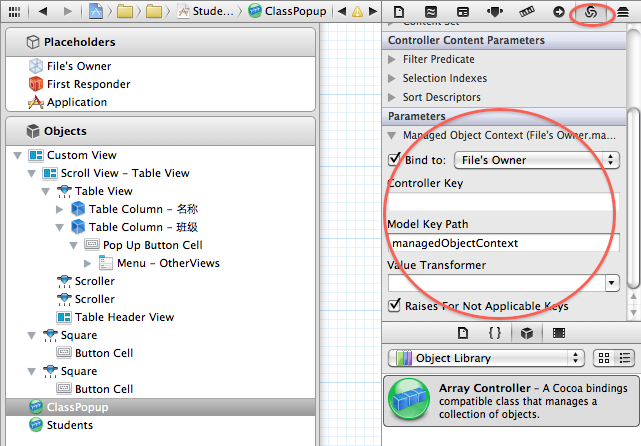
上面的这些操作,ClassPopup ArrayController 管理 ClassEntity 的数据,Students ArrayController 管理 StudentEntity 的数据,后面我们就要将控件与这些 ArrayController 绑定起来。下面我们将这两个 NSArrayController 的 ManagedObjectContext 参数与 ManagedViewController(File's Owner) 中的 managedObjectContext 绑定起来,这样
NSDocuments 的 NSManagedObjectContext 就作用到的 ArrayController 中来了。下面只演示了 ClassPopup,请自行完成 Students 的绑定:
前面我们在 ManagedViewController 创建了一个 IBOutlet contentArrayController,现在是将它关联的时候了,使用 Control-Drag 将 File's Owner 的 contentArrayController 关联到 Students。
重复上面的过程,选中 ClassView.xib,将 File's Owner 的类为 ClassViewController,并将其 view 指向 custom view。
向其中拖入三个 NSArrayController:Classes,MonitorPopup 和 Students。
设置 Classes 的 Object Controller Mode 为 Entity Name,实体名为:ClassEntity,并勾选 Prepare Content。
将 Classes 的 ManagedObjectContext 参数与 ManagedViewController(File's Owner) 中的 managedObjectContext 绑定起来。
注意:这里没有对 MonitorPopup 和 Students 进行修改。
使用 Control-Drag 将 File's Owner 的 contentArrayController 关联到 Classes。
将 Students 和 MonitorPopup 的 Content set 绑定到 Classes 的 Model key path: students,表示这两个 ArrayController 是管理对应 ClassEntity 的 students 的数据。
至此,模型, ArrayController 都准备好了,下面我们将控件绑定到这些对象上。上面已经够繁琐的了,下面我们得更加仔细,很容易出错的。
选中 StudentView.xib,展开 Custom View 中的 TableView,直到我们看到名称和班级两个 Table Column。
选中名称列,将其 value 绑定到 Students,model key path 为:name,表明第一列显示学生的名称;
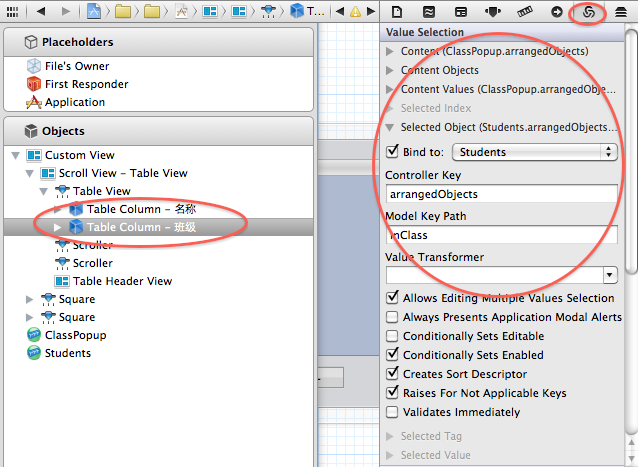
选择班级列,注意这一列是popup button cell,
将其 Content 绑定到 ClassPopup;
将其 ContentValues 绑定到 ClassPopup,model key path 为:name,表明第二列的选项为班级的名称;
将其 Selected Object 绑定到 Students,model key path 为:inClass;表明将学生添加为选中班级的一员;
选中 + button,使用 Control+Drag将其托拽到 Students 上,选择 add: 动作关联;
选中 - button,使用 Control+Drag将其托拽到 Students 上,选择 remove: 动作关联;
选中 - button,将其 Eanbled 绑定到 Students, ctroller key 为:canRemove;
以上操作是将添加,删除学生的操作直接与 Students ArrayController 绑定,无需编写一点儿代码!
选中 ClassView.xib
展开 Custom View 中的班级表,,直到我们看到班级 Table Column:选择班级列,将其 value 绑定到 Classes,model key path 为:name,表明这一列显示班级的名称;
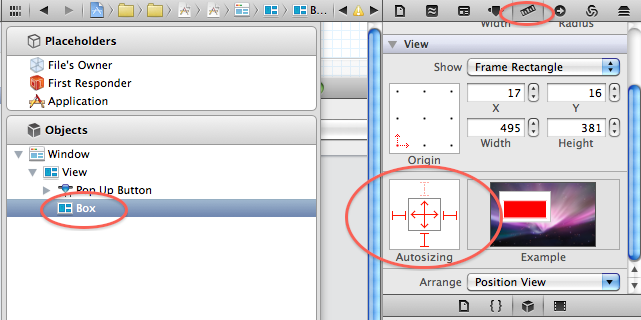
选中 Box,将其 Title 绑定到 Classed,model key path 为:name,并设置下方的 No Selection Placeholder 为:No Selection,Null Placeholder 为:Unnamed Class。 表明 box 显示的信息为选中班级的信息,如果没有选中任何班级,则显示 No Selection。
展开 Box
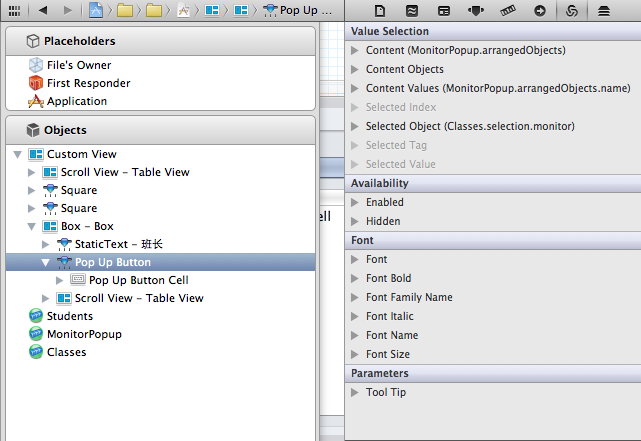
选中 Pop up button
将其 Content 绑定到 MonitorPopup;
将其 ContentValues 绑定到 MonitorPopup,model key path 为:name,表明其选项为班级中的学生的名称;
将其 Selected Object 绑定到 Classes,model key path 为:monitor;表明将选中的学生当作该班级的班长;
展开学生 tabel view,直到我们看到学生这个 Table Column。
选择学生列,将其 Value 绑定到 Students,Model key path 为:name,表明学生列表显示该班级中所有学生的名称。
选中 + button,使用 Control+Drag 将其托拽到 Classes 上,选择 add: 动作关联;
选中 - button,使用 Control+Drag 将其托拽到 Classes 上,选择 remove: 动作关联;
选中 - button,将其 Eanbled 绑定到 Classes, ctroller key 为:canRemove;
以上操作是将添加,删除班级的操作直接与 Classes ArrayController 绑定。
至此,绑定也大功告成,如果你的程序运行不正确,多半是这地方的关联与绑定错了,请回到这部分,仔细检查每一项。
8,显示,切换 view。
现在到了设置主界面的时候,修改 MyDocument.h 中的代码如下:
修改 MyDocument.m 中的代码如下:
在 MyDocument 中,我们创建了两个 ManagedViewController,并将 managedObjectContext 传入其中。这两个ViewController分别代表班级与学生两个界面,然后通过 popup button 的选择在他们之间切换显示;在 displayViewController 中,我们还根据当前界面的大小来调整主界面的大小。这需要我们设置主界面中 box 的自动大小。打开 MyDocument.xib,作如下设置:
然后,使用 Control+Drag,将 File's Owner的 popup 和 popup button相联,box 与 box相联,并将 popup button 的 action 设置为 File's Owner 的 - (IBAction) changeViewController:(id)sender。
至此,所有的工作都完成了。编译运行程序,如果不出意外的话,我们应该可以添加学生,班级,并设置学生的班级,班级的班长等信息了。
分享到:


相关推荐
这是本人在学习和使用 Cocoa 开发过程中写过的一些文章,涵盖 runtime,class, message,KVO,多线程,core data,网络,framework,plugin等各方面。不仅研究了应该如何使用这些技术,还深入底层探究这些技术是...
[奥莱理] Learning Cocoa with Objective-C 4th Edition (E-Book) ☆ 图书概要:☆ You’ll learn how to work with the Xcode IDE, Objective-C’s Foundation library, and other developer tools such as Event...
Cocoa入门-使用Objective-C助您轻松体验...Cocoa入门-使用Objective-C包含了Cocoa框架的最新更新,还包括了便利的API速查参考卡,以及在附录中给出很多重要资源,对任何Cocoa开发人员无论初学者还是高手都很重要。
eclipse-java-2022-06-R-macosx-cocoa-aarch64.dmg 适用于macOS aarch64
eclipse-jee-2022-03-R-macosx-cocoa-x86_64.dmg
Get up to speed on Cocoa and Objective-C, and start developing applications on the iOS and OS X platforms. If you don’t have experience with Apple’s developer tools, no problem! From object-oriented...
eclipse-java-2022-06-R-macosx-cocoa-x86_64.dmg 适用于macOS x86_64
eclipse-java-2022-03-R-macosx-cocoa-aarch64.dmg 适用于macOS aarch64
Building Cocoa Applications - A Step-by-Step Guide.pdf
iOS 和 macOS 性能优化书。iOS and macOS Performance Tuning Cocoa, Cocoa Touch, Objective-C, and Swift
Eclipse IDE for Embedded C/C++ Developers(eclipse-embedcpp-2022-06-R-macosx-cocoa-x86_64.dmg) 适用于macOS x86_64: An IDE for Embedded C/C++ developers. It includes managed cross build plug-ins (Arm...
苹果开发之Cocoa编程原书第4版,想学习mac app开发的可以先看看!
Eclipse IDE for Java Developers (eclipse-java-2021-12-R-macosx-cocoa-aarch64.dmg)适用于macOS aarch64
Cocoa编程经典的入门书籍,图文讲解,易于学习
Cocoa and Objective-C Cocoa and Objective-CCocoa and Objective-C Cocoa and Objective-C
Core Data是Mac OS X中Cocoa API的一部分,首次在Mac OS X 10.4 Tiger与iOS 3.0系统中出现[2]。它允许按照实体-属性-值模型组织数据,并以XML,二进制文件或SQLite数据文件的格式将其串行化。Core Data允许用户使用...
eclipse-cpp-2023-06-R-macosx-cocoa-x86_64.dmg 适用于macOS Intel芯片系统